How to Create an Affiliate Program for Your WooCommerce Store

Affiliate marketing has become a popular strategy for WooCommerce websites to increase their reach and sales.
One such method is by creating a “coupon-based” affiliate program, which offers a unique approach to tracking conversions and rewarding affiliates.
This article will guide you on how to create a coupon-based affiliate program for your WooCommerce store using the popular “Coupon Affiliates” WordPress plugin.
Understanding Coupon Based Affiliate Programs
Traditionally, most affiliate programs track referred customers through unique referral links. However, a coupon-based affiliate program offers an alternative method.
In this setup, regular coupons are attached to a specific affiliate. When a customer uses this coupon at checkout, the affiliate is automatically rewarded with a commission.
This is a great way to ensure the affiliate is always rewarded the commission for their referrals, whether or not the customer has cookies disabled, or their browser is blocking cookies, etc.
This method is also particularly useful on certain social media platforms, such as Instagram, which often limit the effectiveness of referral links.
With that being said, it is still possible to create referral links that will automatically apply the coupon code for the customer. We’ll talk about that later in the article.
Setting Up the Coupon Affiliates Plugin
To set up a coupon-based WooCommerce affiliate program using the Coupon Affiliates plugin, follow these steps:
Installing the Plugin
The first step is to download and install the Coupon Affiliates plugin.
The installation process is straightforward and similar to other WordPress plugins.
Simply download the zip file from the free version, or PRO version, and go to “Plugins > Add New” in your WordPress dashboard, upload the file, and install the plugin.
Once installed, and activated, the plugin will be ready to use.
Setup Wizard
A setup wizard should appear when first activating the plugin. This wizard is designed to make the initial setup process of the core features as easy as possible.
Create the Dashboard Page
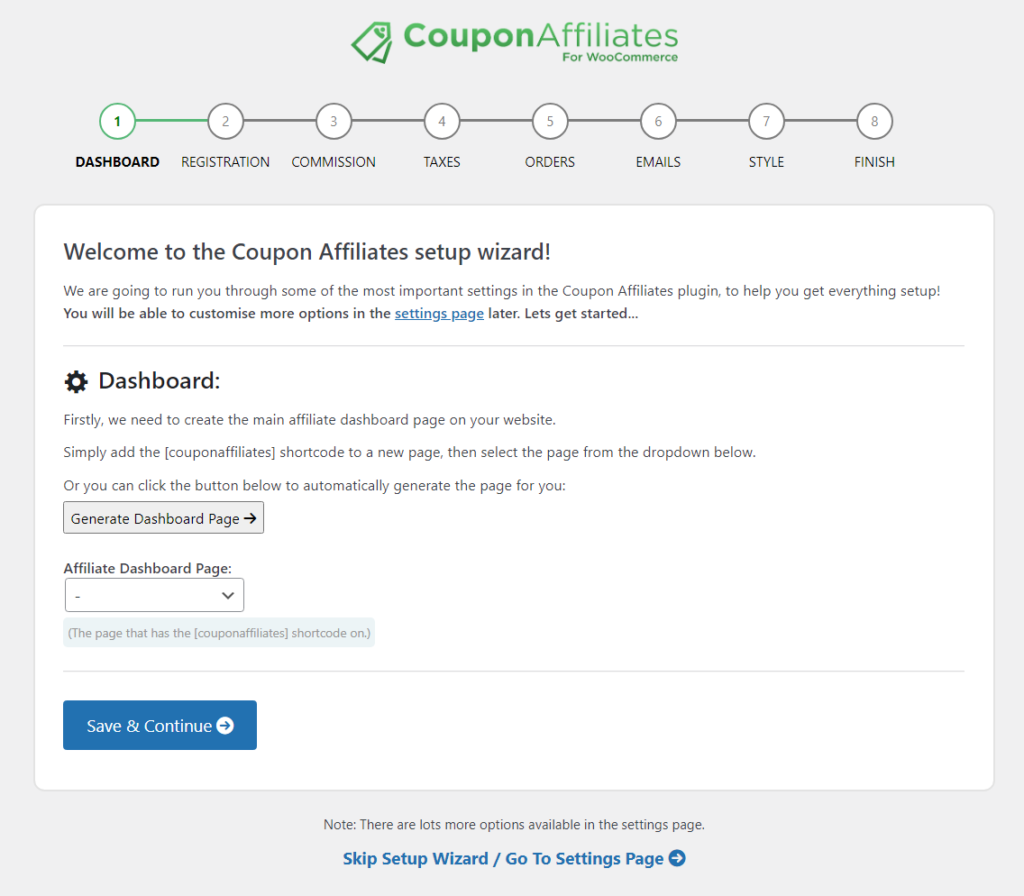
The first step of the setup wizard, is to create the main dashboard page. This is the page where your affiliates will be able to view their statistics, commissions, referral links, and more. To create this page, you need to add the [couponaffiliates] shortcode to a new or existing page, or click the “Generate Dashboard Page” button in the wizard.
Setup the Registration System
The next page in the setup wizard will help you setup the affiliate registration page, where your affiliates can fill out the form to submit an affiliate application.
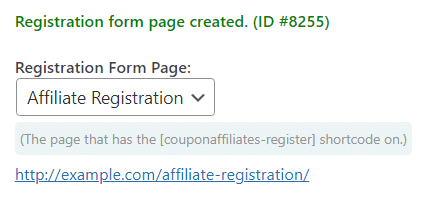
Once again, click the “Generate Registration Page” button to create the affiliate registration page automatically, or add the shortcode [couponaffiliates-register] to a new page manually, and select that page in the dropdown.
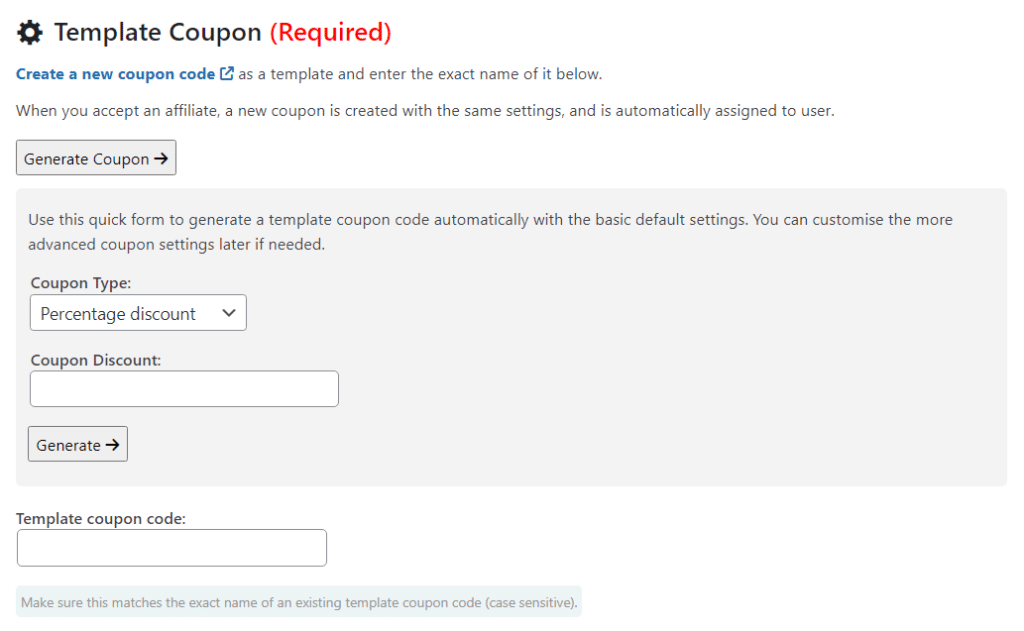
You will also need to create the “Template Coupon” and enter that in the text field provided. When you accept an affiliate registration, a new coupon is created with the same settings as this template coupon, and is automatically assigned to user.
You can click the “Generate Coupon” button to show a form that helps you quickly generate a new template coupon. You can go back and edit the coupon later if required, to customise more options.
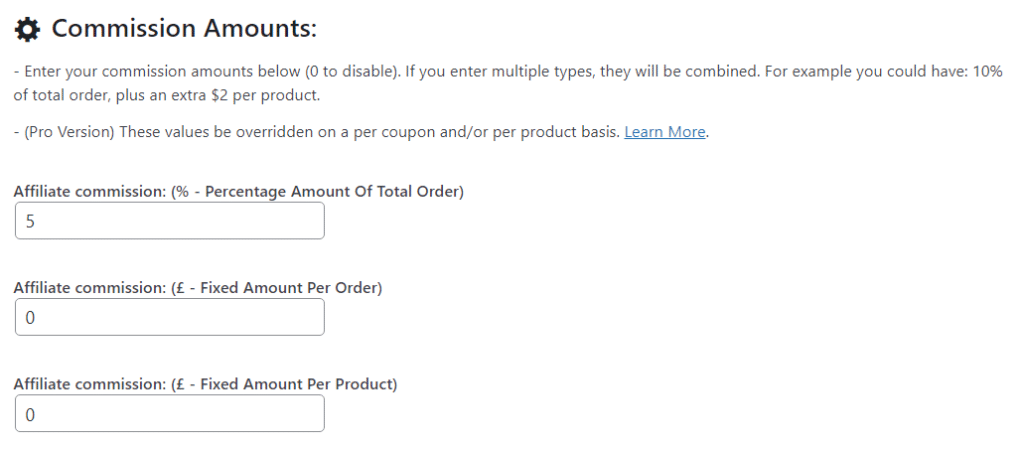
The next page is simple, allowing you to choose your default commission rates. Simply enter your rates in the fields provided.
Continue through the setup wizard and configure all the other settings to your requirements.
Once complete, you will be almost ready to launch your program!
Customise the Settings
The next step is to customise the plugin settings according to your needs. The settings page is divided into several tabs, each containing different options. Here’s a brief overview of what each tab offers:
- General: The general tab contains some of the “general” settings that don’t have any particular category.
- Commission: You can set your flexible commission rates under the “Commission” tab.
- Referral URLs: The referral URLs tab lets you enable referral URLs, set the URL variable, and cookie duration.
- Registration: The registration tab allows you to customise the affiliate registration system and form.
- Emails: The emails tab lets you enable and customise the different emails sent by the plugin.
- Currencies: If you’ve enabled multi-currency support, then a new “currencies” tab will appear for you to set the conversion rates.
- Design: Under the design tab you can customise some of the design for the plugin, including colors and layout.
- Debug: The debug page includes a few options to enable/disable certain features, mainly things that may be affecting performance or having conflicts with your theme / other plugins.
View the Coupons List & Dashboard URLs
Once you’ve set up the plugin and enabled the use of coupon codes, you can now go to the WooCommerce coupons list.
Here, you’ll see a new column for the “Affiliate Dashboard”. In this column, you’ll find a direct link to the affiliate dashboard for each coupon and a button to copy the dashboard URL. This feature makes it easy for you to view each of the affiliates dashboards yourself.
Assign Users to Coupons
The next step is to assign your affiliate users to a coupon.
This allows them to visit the base dashboard page and view the affiliate dashboard for their coupon codes directly, without needing the custom unique URL.
You can assign users to coupons manually by editing a coupon:

Or you can fully automate the process via the affiliate registration system, which we’ll take about more later on in the article.
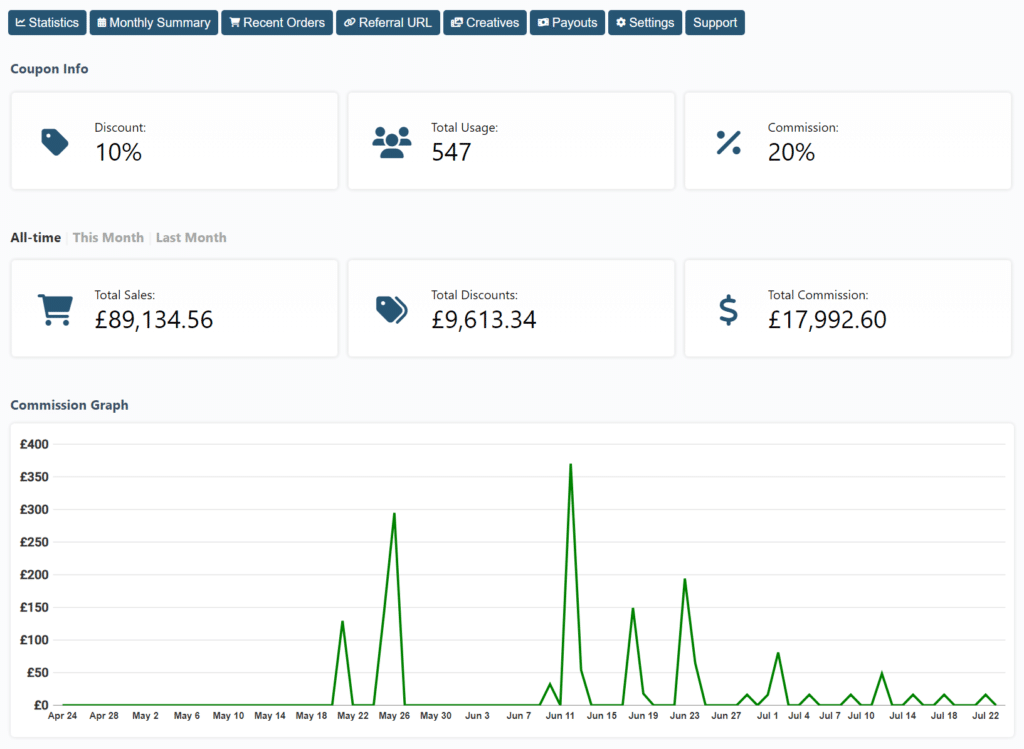
Direct Users to the Affiliate Dashboard
Once the coupons have been created and users assigned, you can link your users directly to the affiliate dashboard page.
They’ll then see the dashboard for the coupon(s) that they are assigned to directly on this page.
Creating An Affiliate Registration System
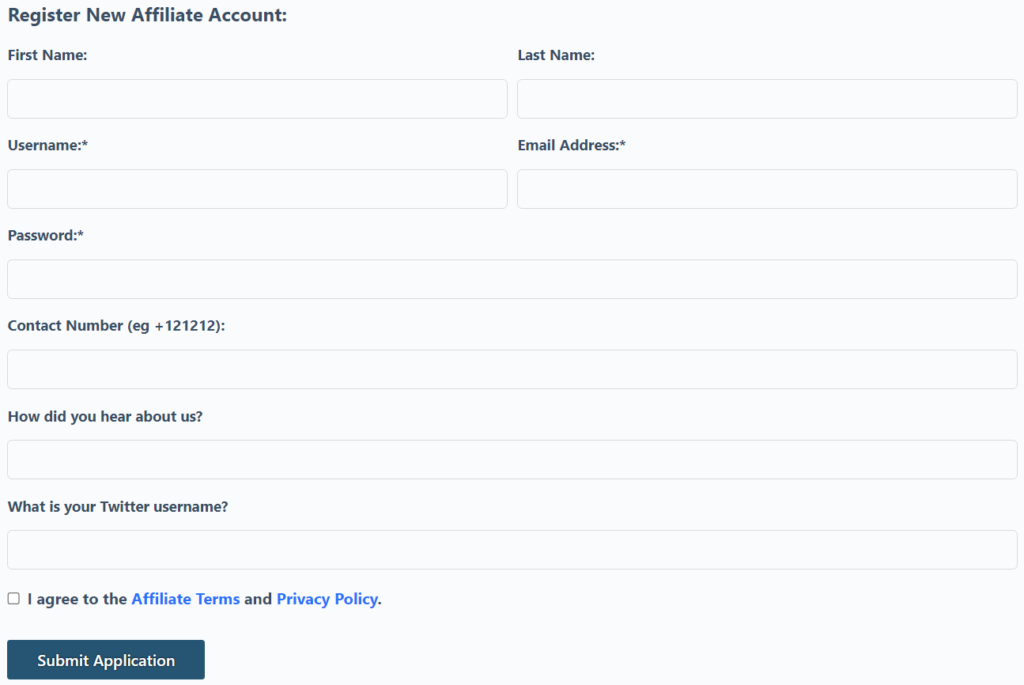
The Coupon Affiliates plugin allows you to display an affiliate registration form on your website.
This form enables users to submit an application for an affiliate account and their own coupon.
Here’s how you can set up the affiliate registration system:
Display the Affiliate Registration Form
By default, the affiliate registration form will be visible to both logged out and logged in users on the affiliate dashboard page. However, you can change this in the settings.
If you want to display the affiliate application form on a custom page, you can use the shortcode: [couponaffiliates-register] – You may have done this already in the setup wizard.
Set Up the Template Coupon
For the affiliate registration form to work, you need to create and assign the “template coupon” in the plugin settings, if you have not already done this in the setup wizard.
When you accept an affiliate application in the admin area, the coupon code selected will be automatically created, using the template coupon code that you have entered in the settings page.
The coupon code will also be automatically assigned to the user, and they’ll be sent an email to let them know their application has been accepted, and how they can get started.
Manage Affiliate Applications
When users submit the affiliate registration form, the selected admin email address will be sent an email notification, notifying you of the new affiliate application. The application will then be visible in the backend for admins to view all submitted details, and either approve or deny it.
You can even include a custom message to display in their accepted/declined email, and change their requested coupon code to something else if needed.
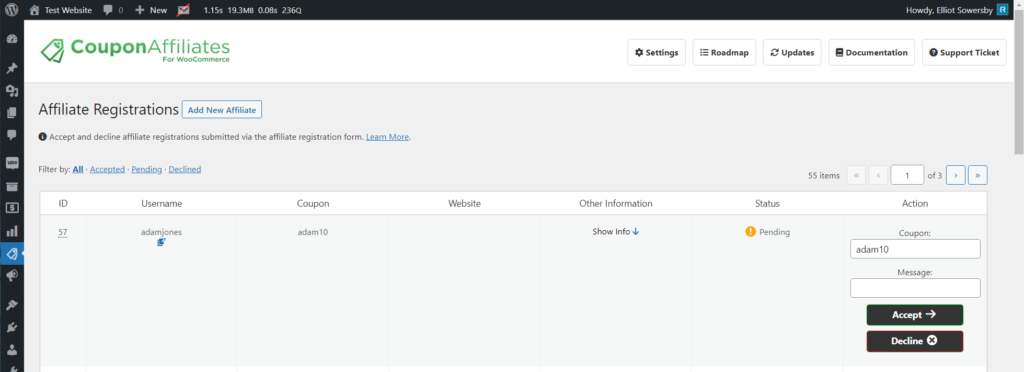
When you click accept, it will automatically create the coupon, assign the user to it, and send them a welcome email with a link to the dashboard.
Manually Add New Affiliates
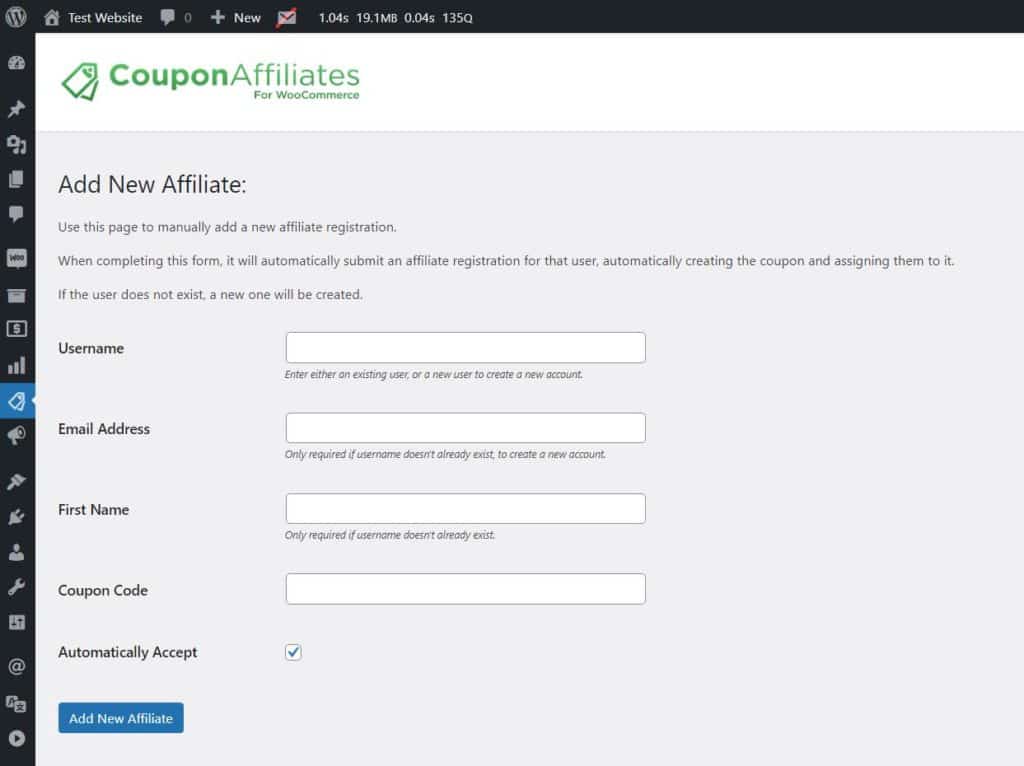
You can also manually add new affiliates yourself by clicking the “Add New Affiliate” button.
This will show a simple form where you can add the affiliate details, coupon code, and submit, to automatically create the affiliate user, coupon code, and assign them to it.
Customize Email Notifications
You can manage and customize all the email notifications sent through the affiliate registration process, in the “Emails” settings tab. The affiliate accepted “welcome” email can be fully customised, and can contain your custom message, details about their affiliate account, and a link directly to the dashboard.
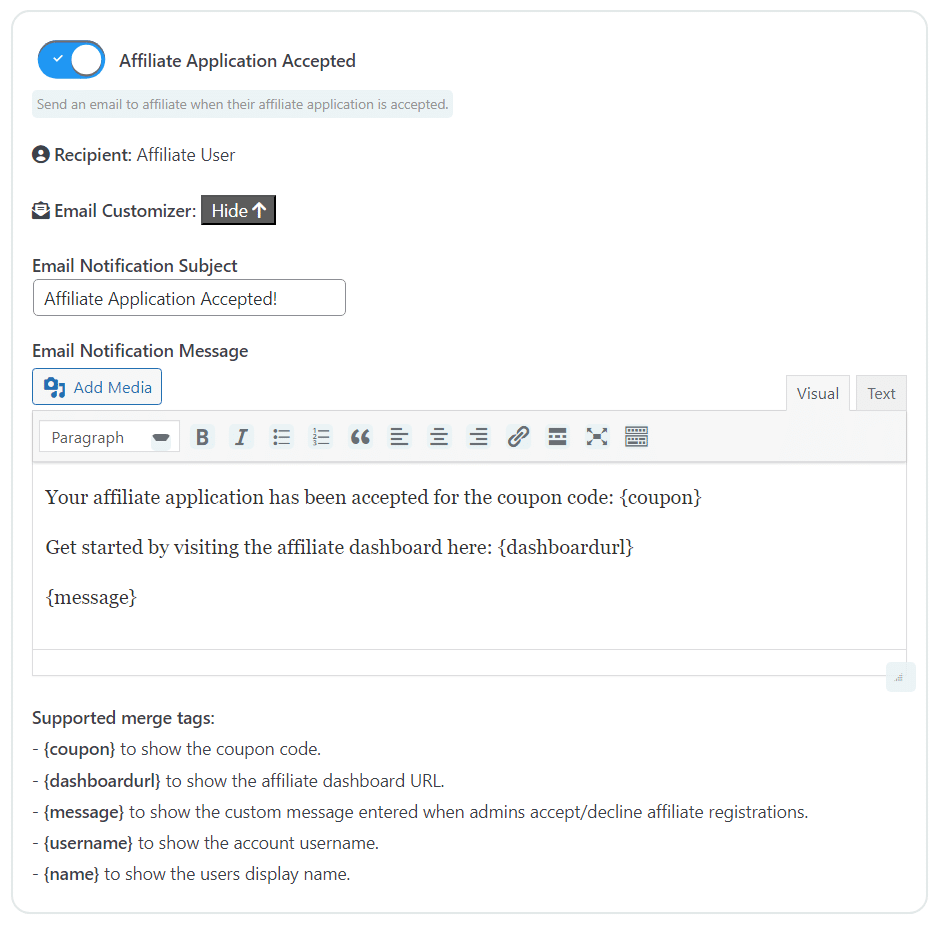
By following these steps, you can create a seamless registration system for your affiliates, making it easy for them to join your program and start promoting your products.
Enable Commission Tracking and Payouts
The Coupon Affiliates plugin provides a robust system for tracking commissions and managing payouts.
Commission Tracking
The plugin allows you and your affiliates to keep track commission earnings in real-time, and view in-depth statistics on the affiliate dashboard.
Payouts System
The PRO version of the Coupon Affiliates plugin offers a comprehensive payout system.
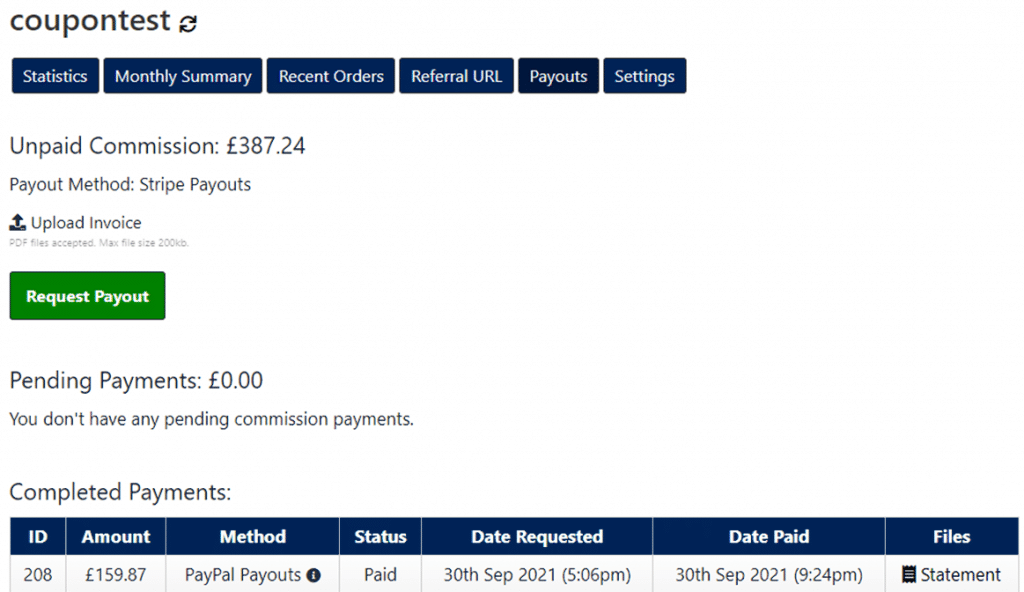
Affiliates can track their commission earned via their referrals, request payouts for commission they have earned, and view their payout history all on their dashboard.
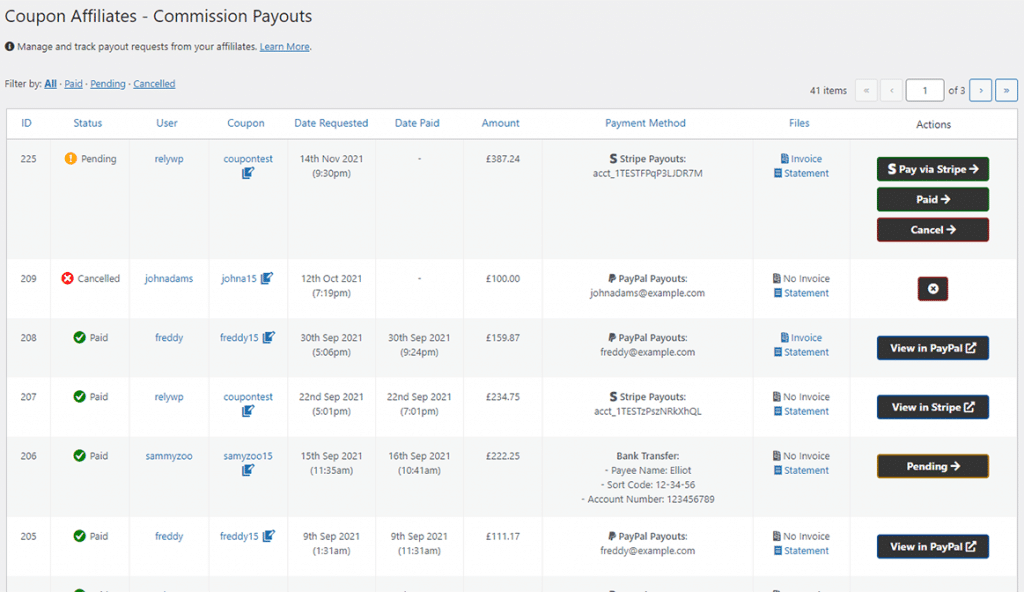
You can view all the payout requests from your affiliates in the ‘Payouts’ admin section of the plugin. The payout requests show the amount requested by the affiliate, the status of the request (pending, paid, or rejected), and the date of the request. You can also view the details of each payout request, such as the affiliate’s name, email, and payout method.
Scheduled Payout Requests
The PRO version also allows you to set up scheduled payout requests. You can set the plugin to automatically submit payout requests for your affiliates every month, week, or day, if they meet certain criteria. This works in the same way as if the user had clicked on the ‘Request Payout’ button in their affiliate dashboard. You can choose whether to automatically request payouts monthly, weekly, or daily, and you can also choose what time of the day it is done.
Automatic Payouts
Another feature of the PRO version is the ability to automatically pay affiliate commissions after a payout request is made. This works with PayPal Payouts, Stripe Payouts, and Store Credit Payouts. There are also options to set certain limitations on when payout requests should not be paid automatically, such as setting a maximum amount that can be paid automatically or requiring manual approval for the affiliates’ first payout request.
Payout Methods
The plugin supports several different payout methods which you can enable in the plugin settings:
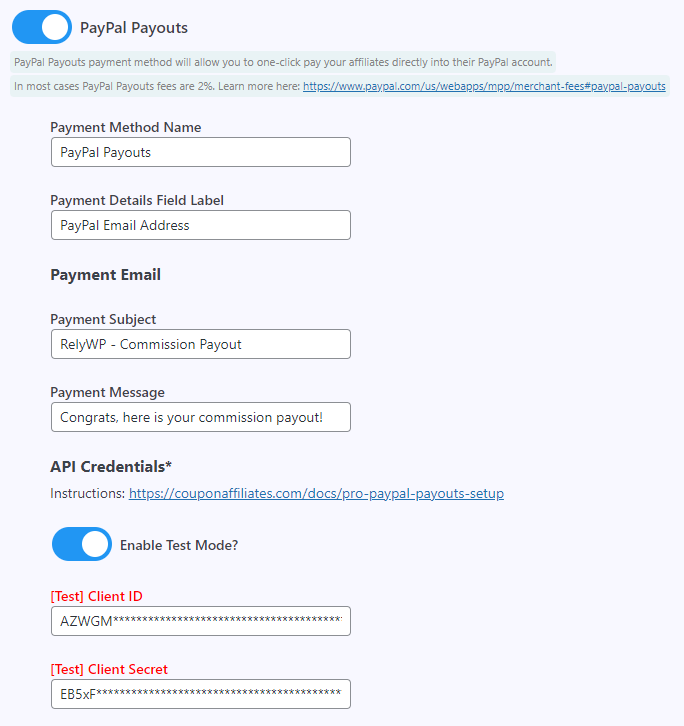
- PayPal Payouts: This allows you to pay affiliate commissions automatically in one-click through PayPal’s Payouts service. Payments will be collected and paid automatically to your affiliates’ PayPal account.
- Stripe Payouts: This allows you to pay affiliate commissions automatically in one-click through Stripe’s “Connect” service. Payments will be collected and paid automatically to your affiliates’ Stripe funds, and bank account.
- Store Credit Payouts: This allows affiliates to have their commission paid out into a “wallet” which they can then use as a discount to purchase items/products from your shop. You can also set a “Bonus Commission” percentage for affiliates choosing “Store Credit” as their payout method.
- Bank Transfer Payouts: This is a manual option for paying affiliate commission. You can view the bank transfer details on the payout request in the admin area, where you can also mark it as paid.
Here’s an example of the PayPal payouts settings:
Remember to always keep an eye on your referrals and payouts to make sure nothing looks suspicious. The Coupon Affiliates plugin provides you with the tools to manage your affiliate program effectively, but it’s up to you to use them wisely.
Build Affiliate Creatives
Your affiliates may require banners, videos and other promotional resources to more effectively promote and advertise your products and services to their audience. These can serve as a visual representation of your business and can help to bring you more potential customers.
As an admin, you can easily manage, add, and edit your creatives in the Coupon Affiliates plugin. Simply go to the “Creatives” sub-menu under “Coupon Affiliates” and you can see a list of your published creatives.

You can add a new creative by clicking “Add New”. Then simply select your creative type, fill out the details, and upload your files.
There are several different creative types available including:
- Images
- Dynamic Images (Learn more)
- Banners
- YouTube Videos
- MP4 Videos
- PDFs
- Brand Colors
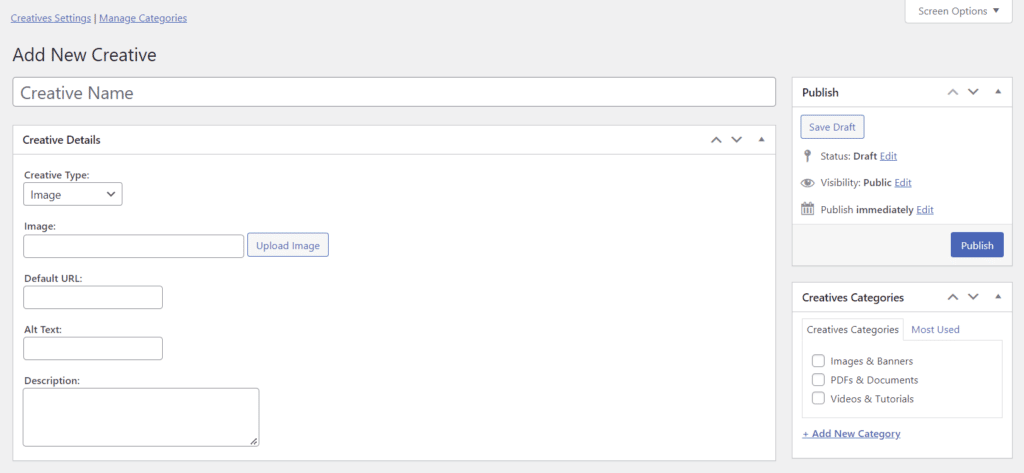
You can select a category for the creatives, to sort them into sections on the affiliate dashboard.
It is also possible to schedule specific creatives to be displayed on the affiliate dashboard for a selected date range. This means you can plan in advance and have the right creative displayed at the right time.
Here are a few ideas to consider for building effective creatives for your affiliates:
- Create Eye-Catching Banner Designs
- Design Relevant Landing Pages
- Provide Quality Product Images
- Write Compelling Product Descriptions
- Provide Pre-Written Content
- Create Effective Email Templates
- Provide Pre-Made Videos
- Provide High-Quality Brand Assets
- Creative Coupon Codes
- Public Relations Materials
- Provide Easy Access To Creatives
- Create Personalised Creatives Dynamically
To learn more, check out our other article: How To Make Effective Creatives For Affiliates
Promote Your Affiliate Program
Once you’ve set everything up, it’s time to start promoting your affiliate program and get users to sign up.
When you’re ready to add an affiliate, create a coupon code for them, and assign the user to it.
Then, give them the link to the affiliate dashboard page, where they can log in and view their dashboard.
The affiliate can then share this coupon code with others, or share the referral URL (generated on their dashboard) to automatically add the coupon code to the customers’ cart.
Whenever someone uses their coupon code, the affiliate earns a commission and can track their statistics in the dashboard, and request payouts!
Save Time With Automation
By automating your affiliate program, you will not only save time but also equip your affiliates with essential tools for success.
Automation steps include setting up custom email notifications, streamlining the registration and approval process, automating payouts, and providing affiliates with automated tools and resources via their dashboard.
To learn more, check out our other article: How To Automate Your WooCommerce Affiliate Program
Conclusion
A coupon-based affiliate program is a powerful tool for businesses looking to expand their reach and increase sales. With the Coupon Affiliates plugin for WooCommerce, setting up such a program is a straightforward process.
By following the steps outlined in this guide, you’ll be well on your way to creating a successful affiliate program for your WooCommerce store.
Try Coupon Affiliates PRO today with a free 7 day trial.
If you have any questions or feedback, please feel free to reach out to us.
Elliot Sowersby is a WordPress developer from Yorkshire, United Kingdom. He is the founder and lead developer of Coupon Affiliates and RelyWP.


Leave a Reply