Need help getting started with the plugin? Here is a quick setup guide:
More guides: Affiliate Registration / Commission Payouts / Multi-Level Affiliates
Interested in hands-on support where we take care of everything for you? Check out our plugin setup services.
Or view a detailed step-by-step written guide below.
(1) Installing the Plugin
First, you need to install the plugin. If you’ve not done this yet, see this guide.
2) Complete Setup Wizard
Once you’ve installed the plugin, the first thing you will see is the setup wizard. This will guide you through setting up some of the core features of Coupon Affiliates.
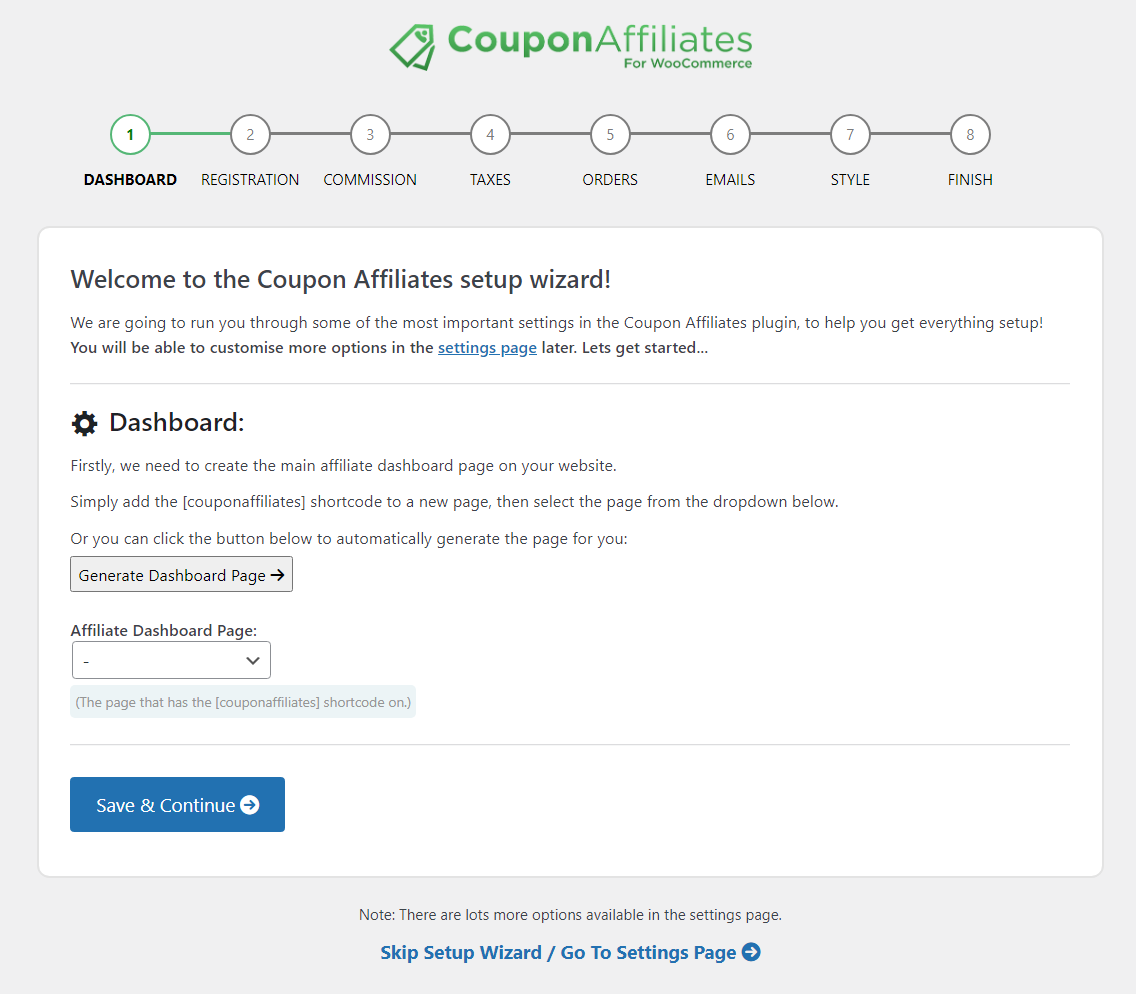
Create the Dashboard Page
The first step is to create the affiliate dashboard page. This is done by adding the [couponaffiliates] shortcode to a page, or simply by clicking the “Generate Dashboard Page” button. This will create the page for you.
If you created the dashboard page manually by adding the shortcode to a page, you will need to make sure you’ve assigned this page in the dropdown, so the plugin knows which page to use.
Setup the Registration System
The next page in the setup wizard will help you setup the affiliate registration page, where your affiliates can fill out the form to submit an affiliate application.
Once again, click the “Generate Registration Page” button to create the affiliate registration page automatically, or add the shortcode [couponaffiliates-register] to a new page manually, and select that page in the dropdown.

You will also need to create the “Template Coupon” and enter that in the text field provided. When you accept an affiliate registration, a new coupon is created with the same settings as this template coupon, and is automatically assigned to user.
You can click the “Generate Coupon” button to show a form that helps you quickly generate a new template coupon. You can go back and edit the coupon later if required, to customise more options.

The next page is simple, allowing you to choose your default commission rates. Simply enter your rates in the fields provided.

Continue through the setup wizard and configure all the other settings to your requirements.
Once complete, you will be almost ready to launch your program!
(3) Customise the Settings
Once you’ve got the basic setup wizard done, now you can go ahead and customise the settings further if required.
Simply navigate around the settings page (select the tabs) and customise everything to meet your requirements.
General: The general tab contains some of the “general” settings that don’t have any particular category.
Commission: You can set your flexible commission rates under the “Commission” tab.
Referral URLs: The referral URLs tab lets you enable referral URLs, set the URL variable, and cookie duration.
Emails: The emails tab lets you enable and customise the different emails sent by the plugin.
Currencies: If you’ve enabled multi-currency support, then a new “currencies” tab will appear for you to set the conversion rates.
Design: Under the design tab you can customise some of the design for the plugin, including colors and layout.
Debug: The debug page includes a few options to enable/disable certain features, mainly things that may be affecting performance or having conflicts with your theme / other plugins.
(4) Enable the use of coupon codes
Make sure the “Enable the use of coupon codes” checkbox is enabled in WooCommerce > Settings > General. This should have been enabled for you automatically by our plugin.

(5) View the Coupons List & Dashboard URLs
Next up, you can now go to the WooCommerce coupons list, and you’ll see a new column for the “Affiliate Dashboard”.
In this column you’ll see a direct link to go to the affiliate dashboard for that coupon, where you can view the dashboard and statistics for all your affiliates coupons.

If you assign the user to the coupon, they won’t need to use the unique URL to view their dashboard (see the next step).
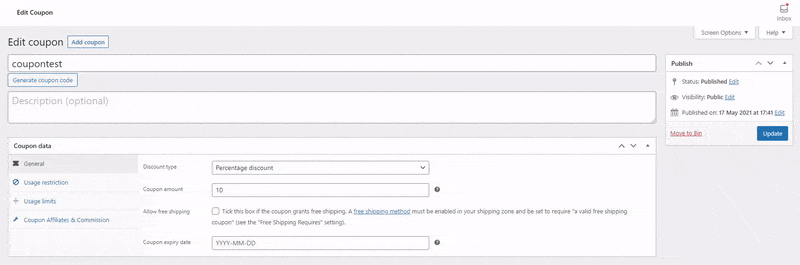
(6) Assign Users to Coupons
You can go one step further and assign your affiliate users to a coupon directly, so they can simply visit the base dashboard page and it will show the affiliate dashboard for their coupon codes directly, without them needing the custom unique URL. It will also then make the dashboard page private/visible to their user account only (and admins).
To do this, simply edit a coupon code, go to the “Coupon Affiliates” tab, and assign the user:
Affiliate users and coupons will be created for you automatically when using the affiliate registration system, along with automated welcome emails.
(7) Direct Users to the Affiliate Dashboard
Now that the coupons have been created, and you assigned users to them, you can link/direct your users directly to the affiliate dashboard page.
They’ll then see the dashboard for the coupon(s) that they are assigned to directly on this page.
On the dashboard, they will then be able to view their affiliate statistics, commissions, referral links generator, and more.
If you are using the PRO version, they’ll also see the monthly summary, creatives, and payouts tabs.

(8) Share your Affiliate Program & Setup Signup Forms
Once you’ve got everything setup, now it’s time to start promoting your affiliate program, and get users to signup.
When you’re ready to add an affiliate, simply create a coupon code for them, and assign the user to it.
Then simply give them the link to the affiliate dashboard page (maybe add this to your menu/site somewhere), where they can login and instantly view their dashboard.
The affiliate can then share this coupon code with others, or share the referral URL (generated on their dashboard) to automatically add the coupon code to the customers cart.
Whenever someone uses their coupon code, the affiliate gains commission!
Affiliate Registration Form
The affiliate registration form is available for your users to apply to become an affiliate. This will automatically create the coupon code for them, and more. Click here to learn more.
(9) Using the PRO version?
If you are using the PRO version, here are some more simple guides on setting up some of the main features:
- Commission Payouts
- Direct Link Tracking
- Creatives
- Affiliate Email/PDF Reports
- Multi-Level Affiliates
(10) Need help? Contact us.
If you need help with anything at all, please contact us.
Using the free version? Please check out previous support posts on WordPress forums or submit a new ticket!
(11) Upgrade to PRO
If you want more advanced features, including advanced affiliate registration forms, unpaid commission tracking, commission payout requests, one-click Stripe/PayPal payouts, store credit payouts, affiliate email reports, invoices, PDF statements, and much more, feel free to check out the PRO version of the plugin.
Try PRO now with a 7 day trial!
If you are already using the PRO version, then you can get started by enabling PRO features in the plugin settings, under the “PRO Modules” tab.